Endoplus
Laparoscopic Scissors Insert Instructions for Use
2 Pages
Preview
Page 1
Manual Cleaning Instructions for Scissors Inserts and Laparoscopic Rack:
Instructions For Use
1. Prepare an enzymatic / neutral pH detergent in warm water (15°C - 30°C or 59°F to 86°F) per detergent manufacturer’s IFU (Instructions for Use). 2. Prior to removing Inserts from the Handle Assembly, flush the device with a minimum of 60mL of enzymatic/neutral pH detergent solution through the Luer Port. 3. Completely immerse assembled devices in the enzymatic/neutral pH detergent solution and allow devices to soak for a minimum of 5 minutes. Actuate all movable parts during the initiation of the soak time. 4. Remove Inserts from the Handle Assembly. 5. Ultrasonic clean Inserts/Devices/Laparoscopic Rack in enzymatic/neutral pH detergent solution for a minimum of 10 minutes. 6. Using a hand held soft bristle brush, use a back and forth motion to brush all surfaces of Inserts/Devices/Laparoscopic Rack with particular attention paid to jaws, clevis, linkage mechanism, and crevices. External Brush Characteristics: Soft nylon (nonmetallic) bristled tooth brush 7. Rinse Inserts/Devices/Laparoscopic Rack by completely immersing in enzymatic/neutral pH detergent solution. 8. If visible soil is detected following the rinse, repeat ultrasonic, brushing, and rinsing steps until visible soil is no longer detected. 9. Rinse the Inserts/Devices/Laparoscopic Rack by completely immersing in warm water for a minimum of 30 seconds to remove any residual detergent or debris. 10. Visually examine each Inserts/Devices/Laparoscopic Rack for cleanliness. 11. If visible soil remains, repeat cleaning procedure.
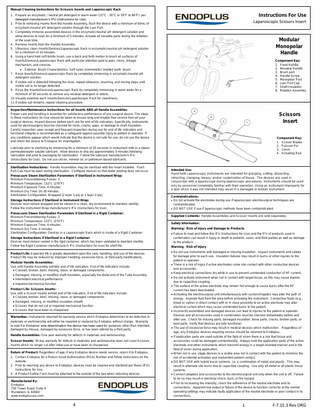
Laparoscopic Scissors Insert
Modular Monopolar Handle Component Key: 1. Fixed Handle 2. Movable Handle 3. Brush port 4. Handle Screw 5. Monopolar Post 6. Luer Port Cap 7. Shaft Insulation 8. Rotation Assembly
Inspection/Maintenance Instructions for all Inserts AND all Handle Assemblies: Proper care and handling is essential for satisfactory performance of any surgical device. The steps in these Instructions for Use should be taken to ensure long and trouble-free service from all your surgical devices. Inspect devices before each use for end of life indicators. Specifically, instruments used for electrosurgery must be checked for nicks, cracks, gaps, or damage to shaft insulation. Careful inspection upon receipt and frequent inspection during use for end of life indicators and functional integrity is recommended as a safeguard against possible injury to patient or operator. If any conditions appear which would indicate that the device is not safe for use, do not use the device and return the device to Endoplus for investigation.
Scissors Insert Component Key: 1. Scissor Blades 2. Fulcrum Pin 3. Clevis 4. Actuating Rod
Lubricate prior to sterilizing by immersing for a minimum of 30 seconds in instrument milk or a steam permeable/water soluble lubricant. Allow devices to drip dry approximately 3 minutes following lubrication and prior to packaging for sterilization. Follow the lubricant manufacturer's IFU (Instructions for Use). Do not use silicon, mineral oil, or petroleum based lubricants. Sterilization Instructions: Handle Assemblies may be sterilized with the Insert installed. Flush Port Cap must be open during sterilization. Configure devices so that water pooling does not occur. Prevacuum Steam Sterilization Parameters if Sterilized in Instrument Wrap: Minimum Preconditioning Pulses: 3 Minimum Temperature: 132°C (270°F) Minimum Exposure Time: 4 minutes Minimum Dry Time: 20-30 minutes Sterilization Configuration: Wrapped (2 layer 1-ply or 1 layer 2-ply) Storage Instructions if Sterilized in Instrument Wrap: Devices must remain wrapped and be stored in a clean, dry environment to maintain sterility. Follow the Instrument Wrap manufacturer's IFU (Instructions for Use). Prevacuum Steam Sterilization Parameters if Sterilized in a Rigid Container: Minimum Preconditioning Pulses: 3 Minimum Temperature: 132°C (270°F) Minimum Exposure Time: 4 minutes Minimum Dry Time: 0 minutes Sterilization Configuration: Devices in a Laparoscopic Rack which is inside of a Rigid Container Storage Instructions if Sterilized in a Rigid Container: Devices must remain sealed in the rigid container, which has been validated to maintain sterility. Follow the Rigid Container manufacturer's IFU (Instructions for Use) for shelf life. Product Life: Expected life is greatly dependent upon the care, handling, and use of the devices. Product life may be reduced by improper handling, excessive force, or third party modifications. Modular Handle Assemblies: Use until Handle Assembly exhibits end of life indicators. End of life indicators include: Cracked, broken, bent, missing, loose, or damaged components. Damaged, missing, or modified shaft insulation, especially the distal end of the Tube Assembly. Intermittent electrical performance Impaired mechanical function Product Life: Scissors Inserts: Use until a Scissor Inserts exhibit end of life indicators. End of life indicators include: Cracked, broken, bent, missing, loose, or damaged components. Damaged, missing, or modified insulation sheath Scissors that do not cut or impaired mechanical function Scissors that have been re-sharpened Warranties: Instruments returned for warranty service which Endoplus determines to be defective in materials or workmanship will either be repaired or replaced by Endoplus without charge. Warranty is void if in Endoplus’ sole determination the device has been used for purposes other than intended, damaged by misuse, damaged by excessive force, or has been altered by a third party. Handle Assemblies: One year warranty for defects in materials and workmanship. Scissor Inserts: 30 day warranty for defects in materials and workmanship does not cover Scissors Inserts which no longer cut after initial use or have been re-sharpened. Return of Product: Regardless of age, if any Endoplus device needs service, return it to Endoplus. 1. Contact Endoplus for a Return Good Authorization (RGA) Number and follow instructions on the website. 2. Prior to returning any device to Endoplus, devices must be cleaned and sterilized per these (IFU) Instructions for Use. 3. A Product Safety Form must be attached to the outside of the box when returning devices. Manufactured By: Endoplus 750 Tower Road, Suite A Mundelein, IL 60060 www.endoplususa.com
4
Intended Use: Hand held Laparoscopic instruments are intended for grasping, cutting, dissecting, retracting, clamping, biopsy, and/or cauterization of tissue. The devices are used in conjunction with a laparoscope during laparoscopic procedures. Instruments should be used only by personnel completely familiar with their operation. Using an instrument improperly for a task which it was not intended may result in a damaged or broken instrument. Contraindications: Do not activate the electrodes during use if laparoscopic electrosurgical techniques are contraindicated. DO NOT USE if use if laparoscopic methods have been contraindicated. Supplied Contents: Handle Assemblies and Scissor Inserts are sold separately. Safety Information: Warning: Risk of Injury and Damage to Products: Failure to read and follow this IFU (Instructions for Use) and the IFU of products used in combination can result in injury or death to patients, users, and third parties as well as damage to the product. Warning: Risk of Injury: Do not use instruments with damaged or missing insulation. Inspect instruments and cables for damage prior to each use. Insulation failures may result in burns or other injuries to the patient or operator. There is a risk of injury if active electrodes come into contact with other conductive devices and accessories. Keep electrical connections dry while in use to prevent unintended conduction of HF current. Do not activate instrument when not in contact with target tissue, as this may cause injuries due to capacitive coupling. The surface of the active electrode may remain hot enough to cause burns after the RF current has been deactivated. Activating the electrosurgical unit simultaneously with suction/irrigation may alter the path of energy. Aspirate fluid from the area before activating the instrument. Conductive fluids (e.g., blood or saline) in direct contact with or in close proximity to an active electrode may alter electrical current which may cause unintended burns to the patient. Incorrectly assembled and damaged devices can lead to injuries to the patient or operator. Devices and all accessories used in combination must be checked immediately before and after use. Check for missing parts, damaged insulation, loose parts, cracks, broken parts, or bent parts. Verify that devices are fully functional. The use of excessive force may result in medical devices which malfunction. Regardless of age, any Endoplus devices requiring service should be returned to Endoplus. If application parts are used outside of the field of vision there is a risk that tissue and accessories could be damaged unintentionally. Always hold the application parts of the active electrode and other instruments which transmit energy in a target-oriented manner and in the field of vision during application. When not in use, stage devices in a visible area not in contact with the patient to minimize the risk of accidental activation and inadvertent patient contact. DO NOT USE with hybrid trocar systems, i.e. a combination of metal and plastic. This may result in alternate site burns due to capacitive coupling. Use only all-metal or all plastic trocar systems. Connect adaptors and accessories to the electrosurgical unit only when the unit is off. Failure to do so may result in electrical shock, burn, or fire hazard. Prior to increasing the intensity, check the adherence of the neutral electrode and its connections. Apparent low output or failure of the device to function correctly at the normal operating settings may indicate faulty application of the neutral electrode or poor contact in its connections.
1
F-7.15.3 Rev ORG
Warning: Risk of injury: The electrosurgical cord must cover the Monopolar Post. - (see Figure 1)
Step 2: Grasp the rotation assembly with one hand to keep it from turning while unscrew (turn counter-clockwise) the Insert from the shaft assembly until it can be pulled from the shaft assembly-(See Figure 3)
Figure 1 DO NOT EXCEED maximum output voltage of 2000 Volts Peak at a Crest Factor < 1.6 DO NOT EXCEED maximum output voltage of 2100 Volts Peak at a Crest Factor < 2.8 DO NOT EXCEED maximum output voltage of 3000 Volts Peak at a Crest Factor < 5.5 The non-conductive Luer Port Cap must securely cover the Luer Port during use. Neither the product nor the product container contains Natural Rubber Latex. Test cuts with scissors of materials containing Natural Rubber Latex may contaminate the device and result in an allergic reaction. Warning: Risk of fire: DO NOT activate the electrode in the presence of flammable anesthetics or oxidizing gases (such as nitrous oxide (N2O) and oxygen) or in close proximity to volatile solvents (such as ether or alcohol), as explosion or fire may occur. DO NOT place instrument near or in contact with flammable materials (such as gauze or surgical drapes). Instruments which are activated or hot from use may cause a fire.
Figure 3 Directions for Installing an Insert into Modular Monopolar Handle Assembly: Note: Disassembly for cleaning does not require mechanical tooling. (i.e. screwdriver, etc.) Step 1: Position the Handle and Rotation Assembly upside down– allowing the spring loaded movable handle to open completely-(See Figure 4)
Warning: Risk of infection: Devices ship from manufacturer non-sterile. Clean and sterilize per these IFU (Instructions for Use) prior to use. Do not reuse devices which are suspected to have been contaminated with transmissible spongiform encephalopathy (TSE) agents (prions). Caution: Federal (USA) law restricts this device to sale by or on the order of a physician. Incorrect application of medical devices poses a risk of injury. Users of medical instruments must have an appropriate medical qualification and be acquainted with the application. Laparoscopic surgery may result in gas embolism due to insufflation of gas into the abdomen. Sharp edges or pinch points may damage personal protective equipment such as surgical gloves. Due to the carcinogenic and infectious potential of electrosurgical by-products (such as tissue smoke plume and aerosols), protective eyewear, filtration masks, and effective smoke evacuation equipment should be used in both open and laparoscopic procedures. Do not re-sharpen Scissors. Keep the active electrodes clean. Build-up of eschar may reduce the instrument’s effectiveness. Do not activate the instrument while cleaning. Use instruments only in conditions that assure adequate visualization to minimize risk of misapplied electrosurgical energy. Output power selected should be as low as possible for the intended purpose. A singular instrument must be the sole conductor of energy to tissue. Do not conduct energy by touching an instrument to a second instrument contacting tissue. Wear of Insert clevis may be an indication of impending mechanical failure, which may result in component coming loose during use. Proper care and maintenance of hand held laparoscopic instruments is essential for safe and effective operation. Prior to each use, instruments should be thoroughly examined for end of life indicators such as broken or worn parts which may inhibit the function. Specifically, instruments used for electrosurgery must be checked for nicks, cracks, or damaged insulation. Careful inspection upon receipt and frequent inspection during use for functional integrity is recommended as a safeguard against possible injury to patient or operator. Instruments should be used with extreme care when Inserting or removing from the cannula. Lateral pressure on the device during removal can damage the working tip, the shaft of the device, and/or insulation. Be sure the tips are closed and the device is pulled straight out until completely clear of cannula to avoid catching valve assemblies or dislodging the cannula. The non-conductive Luer Port Cap must be installed securely on the flush port during use to minimize insufflation leakage from the patient. The Luer Port Cap must NOT cover the flush port during cleaning and sterilization. Use of instrument for a task other than that for which it is intended may result in a damaged or broken device. For example: Use of a scissors to cut staples Incorrect placement of trocars can adversely affect instrument effectiveness, patient safety, and operator comfort. Electrosurgical Cords must comply with IEC 60601-2-2:2009. Always reference and follow the IFU (Instructions for Use) for Electrosurgical Cords. Electrosurgical Generators must comply with IEC 60601-2-2:2009. Always reference and follow the IFU (Instructions for Use) for the ESU (Electrosurgical Generator). Directions for Removing an Insert from Modular Monopolar Handle Assembly: Note: Disassembly for cleaning does not require mechanical tooling. (i.e. screwdriver, pliers, etc.) Step 1: Position the Handle and Rotation Assembly upside down– allowing the spring loaded movable handle to open completely-(See Figure 2)
Figure 4 Step 2: Place the Insert into the shaft of the instrument. The Movable Handle will transition from “Hyperextend” Position to the “Active” position once the Insert is installed correctly. Screw the Insert into the Shaft Assembly (turn clockwise) until the threaded clevis is fully seated against the shaft-(See Figure 5)
Figure 5 Step 3: Verify that the Insert was installed correctly – if movement of the Moveable Handle translates to jaw movement, then Insert was correctly installed. Processing and Sterilization Instructions Pre-processing Instructions: Initiate cleaning within 30 minutes of use and do not allow soil to dry prior to cleaning. Inspect devices for end of life indicators. (See Product Life on p.4 for end of life indicators) Manual Cleaning Instructions for all Handle Assemblies: 1. Prepare an enzymatic/neutral pH detergent in warm water (15°C - 30°C or 59°F to 86°F) per enzymatic/neutral pH detergent manufacturer’s IFU (Instructions for Use). 2. Prior to removing the Inserts from the Handle Assembly, flush the device with a minimum of 60mL of an enzymatic/neutral pH detergent solution through the Luer Port. 3. Completely immerse assembled devices in the enzymatic/neutral pH detergent solution and allow devices to soak for a minimum of 5 minutes. Actuate all movable parts during the initiation of the soak time. 4. Remove Inserts from the Handle Assembly. Note: Clean Inserts separately per Manual Cleaning Instructions for Scissors Inserts and Reusable Inserts. 5. Ultrasonic clean devices in enzymatic/neutral pH detergent solution for a minimum of 10 minutes. 6. Using a hand held soft bristle brush, use a back and forth motion to brush all exterior surfaces of devices with particular attention paid to Monopolar Post, crevices, grooves, fitting, and joints. 7. Pass a brush through the entire length of the interior lumen a minimum of three (3) times for cleaning prior to sterilization. A brush can be Inserted into the Handle Access for Cleaning and removed by pulling it from the distal end of the Handle Assembly. Lumen Brush Characteristics: 5mm diameter with soft nylon (nonmetallic) bristles, 230mm handle length External Brush Characteristics: Soft nylon (nonmetallic) bristled tooth brush 8. Flush the Handle Assembly with a minimum of 60mL of enzymatic/neutral pH detergent solution through the Luer Port. Repeat the flush process a minimum of 2 times or until all fluid exiting the lumen is clear of soil. 9. If visible soil is detected during the final lumen flush, repeat ultrasonic, brushing and flushing steps until all fluid exiting the lumen is clear of soil. 10. Rinse the devices by completely immersing in warm water for a minimum of 30 seconds to remove any residual detergent or debris. Flush devices with a minimum of 60ml of warm tap water through the Luer Port. Repeat the flush process a minimum of 2 times. 11. Manipulate devices with lumens to allow rinse water to drain from the lumen. 12. Visually examine each instrument for cleanliness and repeat cleaning procedure if visible soil remains.
Figure 2
42
31
F-7.15.3 Rev ORG