KARL STORZ ENDOSKOPE
Image Management Systems
AIDA Compact II Image Capture sw ver 2.4 Simplified Instructions
Simplified Instructions
2 Pages
Preview
Page 1
AIDA Compact II Image Capture System (Software v 2.4) Simplified Instructions 1
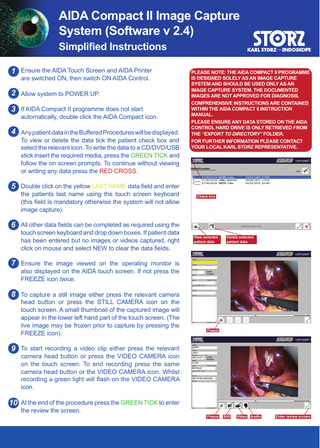
Ensure the AIDA Touch Screen and AIDA Printer are switched ON, then switch ON AIDA Control.
2
Allow system to POWER UP.
3
If AIDA Compact II programme does not start automatically, double click the AIDA Compact icon.
4
Any patient data in the Buffered Procedures will be displayed. To view or delete the data tick the patient check box and select the relevant icon. To write the data to a CD/DVD/USB stick insert the required media, press the GREEN TICK and follow the on screen prompts. To continue without viewing or writing any data press the RED CROSS.
5
Double click on the yellow LAST NAME data field and enter the patients last name using the touch screen keyboard (this field is mandatory otherwise the system will not allow image capture).
6
All other data fields can be completed as required using the touch screen keyboard and drop down boxes. If patient data has been entered but no images or videos captured, right click on mouse and select NEW to clear the data fields.
7
Ensure the image viewed on the operating monitor is also displayed on the AIDA touch screen. If not press the FREEZE icon twice.
8
To capture a still image either press the relevant camera head button or press the STILL CAMERA icon on the touch screen. A small thumbnail of the captured image will appear in the lower left hand part of the touch screen. (The live image may be frozen prior to capture by pressing the FREEZE icon).
9
PLEASE NOTE: THE AIDA COMPACT II PROGRAMME IS DESIGNED SOLELY AS AN IMAGE CAPTURE SYSTEM AND SHOULD BE USED ONLY AS AN IMAGE CAPTURE SYSTEM. THE DOCUMENTED IMAGES ARE NOT APPROVED FOR DIAGNOSIS. COMPREHENSIVE INSTRUCTIONS ARE CONTAINED WITHIN THE AIDA COMPACT II INSTRUCTION MANUAL. PLEASE ENSURE ANY DATA STORED ON THE AIDA CONTROL HARD DRIVE IS ONLY RETRIEVED FROM THE “EXPORT TO DIRECTORY” FOLDER. FOR FURTHER INFORMATION PLEASE CONTACT YOUR LOCAL KARL STORZ REPRESENTATIVE.
Check box
View selected patient data
Delete selected patient data
Freeze
To start recording a video clip either press the relevant camera head button or press the VIDEO CAMERA icon on the touch screen. To end recording press the same camera head button or the VIDEO CAMERA icon. Whilst recording a green light will flash on the VIDEO CAMERA icon.
10 At the end of the procedure press the GREEN TICK to enter the review the screen.
Freeze
Still
Video
Audio
Enter review screen
AIDA Compact II Image Capture System (Software v 2.4) Simplified Instructions
11 The review screen allows the captured still images and
Still images
video clips to be reviewed, deleted (RUBBISH BIN icon) and renamed (A-B icon). To return to the capture screen press the RED ARROW. To print the captured still images press the PRINT icon.
Video clips
Audio clips
12 Press the GREEN TICK on the review screen to save the captured data and finish the procedure. Press the GREEN TICK to confirm that you want to finish the procedure.
Delete
Rename Audio
13 To write the captured data to a CD/DVD/USB stick insert
Return to capture screen
Save data
and select the required media, press the GREEN TICK and follow the on screen prompts. To continue without writing to a CD/DVD/USB stick press the GREEN TICK and follow the on screen prompts. The unwritten data will be saved in the back up memory.
14 If data has been written to a CD/DVD/USB stick once the process has been completed the CD/DVD will be ejected or a prompt to remove the USB stick will appear.
15 Either press the GREEN TICK to continue with a new
patient or press the RED CROSS to exit the AIDA Compact II programme and return to the Windows desktop. To start switch off the AIDA Control click the button in the left hand lower corner of the touch screen followed shut down by the command. Or the AIDA Control can be switched off by pressing the front panel button. DO NOT SWITCH OFF AT THE WALL SOCKET UNTIL THE SHUTDOWN PROCESS IS COMPLETE.
TM
KARL STORZ Endoscopy (UK) Ltd. 392 Edinburgh Avenue, Slough, Berkshire SL1 4UF, Great Britain Tel:+44 (0)1753 503500 Fax:+44 (0)1753 578124 E-Mail: [email protected] Web: www.karlstorz.com
To request further copies please call KARL STORZ on 01753 503500 or email [email protected] Ref: SS-SI-AIDACOMPACT-003