Medela
LACTINA Cleaning and Assembly Guide Rev a March 2004
Guide
2 Pages
Preview
Page 1
®
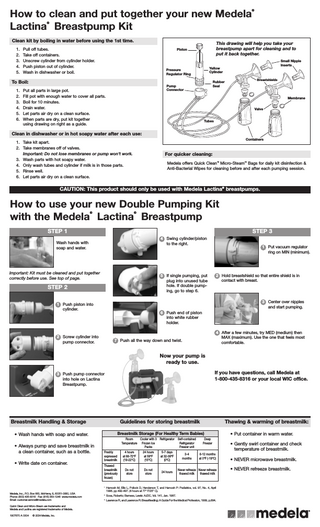
How to clean and put together your new Medela Lactina Breastpump Kit ®
Clean kit by boiling in water before using the 1st time. 1. 2. 3. 4. 5.
Pull off tubes. Take off containers. Unscrew cylinder from cylinder holder. Push piston out of cylinder. Wash in dishwasher or boil.
This drawing will help you take your breastpump apart for cleaning and to put it back together.
Piston
Yellow Cylinder
Pressure Regulator Ring
To Boil: 1. 2. 3. 4. 5. 6.
Rubber Seal
Pump Connector
Put all parts in large pot. Fill pot with enough water to cover all parts. Boil for 10 minutes. Drain water. Let parts air dry on a clean surface. When parts are dry, put kit together using drawing on right as a guide.
Small Nipple Inserts
Breastshields
Membrane Valve
Tubes
Clean in dishwasher or in hot soapy water after each use: Containers
1. Take kit apart. 2. Take membranes off of valves. Important: Do not lose membranes or pump won't work. 3. Wash parts with hot soapy water. 4. Only wash tubes and cylinder if milk is in those parts. 5. Rinse well. 6. Let parts air dry on a clean surface.
For quicker cleaning: Medela offers Quick Clean™ Micro-Steam™ Bags for daily kit disinfection & Anti-Bacterial Wipes for cleaning before and after each pumping session.
CAUTION: This product should only be used with Medela Lactina® breastpumps.
How to use your new Double Pumping Kit with the Medela Lactina Breastpump ®
®
STEP 1
STEP 3 4 Swing cylinder/piston to the right.
Wash hands with soap and water.
Important: Kit must be cleaned and put together correctly before use. See top of page.
5 If single pumping, put plug into unused tube hole. If double pumping, go to step 6.
STEP 2
1 Put vacuum regulator ring on MIN (minimum).
2 Hold breastshield so that entire shield is in contact with breast.
3 Center over nipples and start pumping.
1 Push piston into cylinder.
6 Push end of piston into white rubber holder.
2 Screw cylinder into pump connector.
4 After a few minutes, try MED (medium) then MAX (maximum). Use the one that feels most comfortable.
7 Push all the way down and twist.
Now your pump is ready to use. If you have questions, call Medela at 1-800-435-8316 or your local WIC office.
3 Push pump connector into hole on Lactina Breastpump.
Thawing & warming of breastmilk:
Breastmilk Handling & Storage
Guidelines for storing breastmilk
• Wash hands with soap and water.
Breastmilk Storage (For Healthy Term Babies)
• Always pump and save breastmilk in a clean container, such as a bottle. • Write date on container.
Medela, Inc., P.O. Box 660, McHenry, IL 60051-0660, USA Phone: (800) 435-8316 Fax: (815) 363-1246 www.medela.com Email: [email protected] Quick Clean and Micro-Steam are trademarks and Medela and Lactina are registered trademarks of Medela. 1907670 A 0304
© 2004 Medela, Inc.
Room Cooler with 3 Refrigerator Self-contained Temperature Frozen Ice Refrigerator Packs Freezer unit Freshly expressed breastmilk
4 hours at 66-72ºF (19-22ºC)
24 hours at 59ºF (15ºC)
5-7 days at 32-39ºF (0ºC)
Thawed breastmilk (previously frozen)
Do not store
Do not store
24 hours
3-4 months
Deep Freezer 6-12 months at 0ºF (-19ºC)
Never refreeze Never refreeze thawed milk thawed milk
1
Hamosh M, Ellis L, Pollock D, Henderson T, and Hamosh P: Pediatrics, vol. 97, No. 4, April 1996. pp 492-497. (4 hours at 77° F/25° C).
2
Sosa, Roberto; Barness, Lewis: AJDC, Vol. 141, Jan. 1987.
3
Lawrence R, and Lawrence R: Breastfeeding: A Guide For the Medical Profession, 1999, p.894.
• Put container in warm water. • Gently swirl container and check temperature of breastmilk. • NEVER microwave breastmilk. • NEVER refreeze breastmilk.