Trilliant Surgical
Gridlock Ankle Plating System Cleaning and Sterilization Protocol
2 Pages
Preview
Page 1
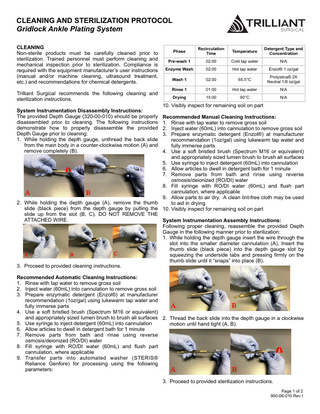
CLEANING AND STERILIZATION PROTOCOL Gridlock Ankle Plating System CLEANING Non-sterile products must be carefully cleaned prior to sterilization. Trained personnel must perform cleaning and mechanical inspection prior to sterilization. Compliance is required with the equipment manufacturer’s user instructions (manual and/or machine cleaning, ultrasound treatment, etc.) and recommendations for chemical detergents. Trilliant Surgical recommends the following cleaning and sterilization instructions. System Instrumentation Disassembly Instructions: The provided Depth Gauge (320-00-010) should be properly disassembled prior to cleaning. The following instructions demonstrate how to properly disassemble the provided Depth Gauge prior to cleaning: 1. While holding the depth gauge, unthread the back slide from the main body in a counter-clockwise motion (A) and remove completely (B).
Phase
Recirculation Time
Temperature
Detergent Type and Concentration
Pre-wash 1
02:00
Cold tap water
N/A
Enzyme Wash
02:00
Hot tap water
Enzol® 1 oz/gal
Wash 1
02:00
65.5°C
Prolystica® 2X Neutral 1/8 oz/gal
Rinse 1
01:00
Hot tap water
N/A
Drying
15:00
90°C
N/A
10. Visibly inspect for remaining soil on part
Recommended Manual Cleaning Instructions: 1. Rinse with tap water to remove gross soil 2. Inject water (60mL) into cannulation to remove gross soil 3. Prepare enzymatic detergent (Enzol®) at manufacturer recommendation (1oz/gal) using lukewarm tap water and fully immerse parts 4. Use a soft bristled brush (Spectrum M16 or equivalent) and appropriately sized lumen brush to brush all surfaces 5. Use syringe to inject detergent (60mL) into cannulation 6. Allow articles to dwell in detergent bath for 1 minute 7. Remove parts from bath and rinse using reverse osmosis/deionized (RO/DI) water 8. Fill syringe with RO/DI water (60mL) and flush part cannulation, where applicable 9. Allow parts to air dry. A clean lint-free cloth may be used 2. While holding the depth gauge (A), remove the thumb to aid in drying slide (black piece) from the depth gauge by pulling the 10. Visibly inspect for remaining soil on part slide up from the slot (B, C). DO NOT REMOVE THE ATTACHED WIRE. System Instrumentation Assembly Instructions: Following proper cleaning, reassemble the provided Depth Gauge in the following manner prior to sterilization: 1. While holding the depth gauge insert the wire through the slot into the smaller diameter cannulation (A). Insert the thumb slide (black piece) into the depth gauge slot by squeezing the underside tabs and pressing firmly on the thumb slide until it “snaps” into place (B). 3. Proceed to provided cleaning instructions. Recommended Automatic Cleaning Instructions: 1. Rinse with tap water to remove gross soil 2. Inject water (60mL) into cannulation to remove gross soil 3. Prepare enzymatic detergent (Enzol®) at manufacturer recommendation (1oz/gal) using lukewarm tap water and fully immerse parts 4. Use a soft bristled brush (Spectrum M16 or equivalent) and appropriately sized lumen brush to brush all surfaces 2. Thread the back slide into the depth gauge in a clockwise 5. Use syringe to inject detergent (60mL) into cannulation motion until hand tight (A, B). 6. Allow articles to dwell in detergent bath for 1 minute 7. Remove parts from bath and rinse using reverse osmosis/deionized (RO/DI) water 8. Fill syringe with RO/DI water (60mL) and flush part cannulation, where applicable 9. Transfer parts into automated washer (STERIS® Reliance Genfore) for processing using the following parameters: 3. Proceed to provided sterilization instructions. Page 1 of 2 900-06-010 Rev I
NON-STERILE PRODUCT STERILIZATION
Trilliant Surgical Implant Systems can be packaged nonsterile and therefore must be sterilized prior to surgical use. Use of the sterilizer shall comply with the manufacturer’s user instructions. The user facility must clean and disinfect instruments prior to sterilization per standard hospital procedures. Non-sterile devices are sterilizable by steam sterilization (autoclaving). The following parameters should be followed: Sterilization Method
Pre-Vacuum Steam
Condition
Wrapped*
Temperature
270°F (132°C)
Time
10 minutes
Recommended Dry Time
50 minutes**
*The system shall be packaged for sterilization by double wrapping in standard central supply wrap (i.e. Bio-Shield® Sterilization Wrap). **Trilliant Surgical has validated the recommended sterilization cycle and dry time for trays. The dry time varies due to load configuration, wrapping method, and material.
This document is controlled by Trilliant Surgical. When downloaded, printed, and/or copied, this document becomes UNCONTROLLED and users should always check Trilliant Surgical’s website, www.trilliantsurgical.com, to ensure they have the latest version.
Trilliant Surgical 727 North Shepherd Drive Suite 100 | Houston, TX 77007 Phone: 800-495-2919 | Fax: 877-778-3864 | www.trilliantsurgical.com
Page 2 of 2 900-06-010 Rev I